


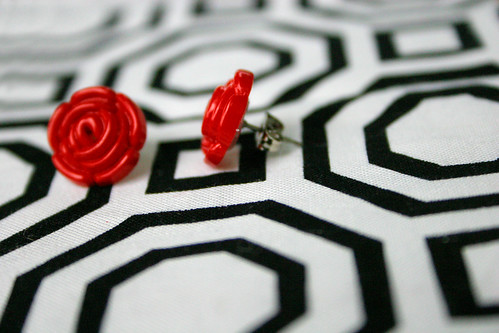
 A few months ago I found the nienie dialogues. I loved her sense of style, especially her choice of earrings. Shortly after I fell in love with her bright red rose earrings I found an identical pair at Forever 21, for only $4.80! I bought as many as I could but like many sets of things (socks, shoes, gloves), one would get lost....found....then lost again. So I found myself back at Forever 21 looking for my favorite rose earrings only to find a whole lot of 80s checkered hoopy things. Ugh. I'm sorry, am I the only one who doesn't like parachute pants and acid washed denim mini skirts?
Then one day, as I was searching for material at my nearby fabric store I had an idea. The store carries hundreds & hundreds of salvage buttons. Their selection is pretty impressive. Among their inventory I found tiny roses.
And with that I made these. They look just like the ones Nienie wears....see here. Her sister cjane actually wrote a post with a link to a store that sells them. But you can 'make them' for less than $1.
Plus, I think this is a GREAT gift idea. I'm going to make a ton of these and give them as extra bonus Christmas and birthday gifts. Something to pad the bag, ya know what I mean?

First choose your buttons. I suggest buying the kind that have a loop in the back rather than holes. It's very easy to snip the loop off the back but it's more difficult to hide holes.
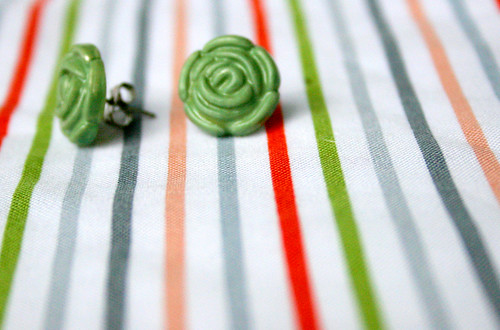
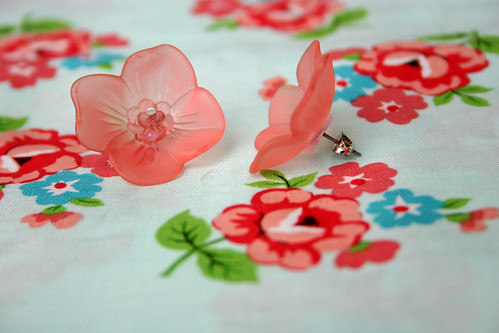
As I mentioned earlier I liked the rose shape. However, I wanted them in red, sea green and yellow. The fabric store only had them in pearl. So I bought several and took them home.
Whoops. That metal button doesn't belong. It fell off my shorts and must have been in my pocket with the rest of the buttons.

You also want to purchase the earring backs (pearl posts and findings). I bought mine at JoAnn Fabric. A pack of ten was only $1. If you can't find them where you live, you can buy a pack of 60 posts and here and a pack of 144 findings here.
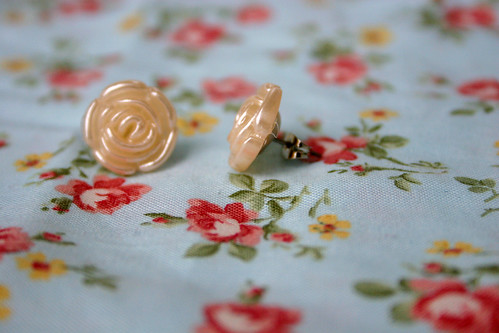
So, now you have your materials. If you didn't find a color you wanted you can do what I did. See pearl colored ones to the left.

I took the rose shaped buttons and spray painted a pair red. Spray paint works well because it dries very quickly, adheres to plastic well and leaves a shiny finish. However, I only had red spray paint. For the sea green earrings see next step.
 For the sea green pair, I used acrylic sea green paint only 50 cents at JoAnns. It said to only use on porous surfaces but for 50 cents I thought I'd give it a try. It seemed to work much better than I anticipated. I could still see a little bit of the pearl underneath but I liked the way it looked....more antiquey. If you want a more solid color a few more coats may be needed. Wait an hour between coats.
After it was dry it had a matte look so I sprayed a little polyurethane I had on hand. But I bet clear nail polish would work just as good!

After it has dried, take a pair of wire cutters and snip the hook off of the back of the button. It should come off very easily. Like butter.
 Then take the post and dab a little hot glue on the tip. Now, if you are making these for a gift I might suggest using something stronger like epoxy resin. You can buy it at most craft stores and hardware stores. It comes in two syringe like containers that you mix together. It will probably hold better than hot glue but if you're in a hurry or don't feel like buying epoxy resin, a glue gun will work just fine.
Brian was nice enough to model this shot. Although he did complain about the glue gun being "hairy".

Once you have the glue on the tip. Put the flat side of the button over the glue and press down. Let dry. Then voila! You're done. It's almost TOO easy!
If you bought a little box and batting you could easily give these as gifts.

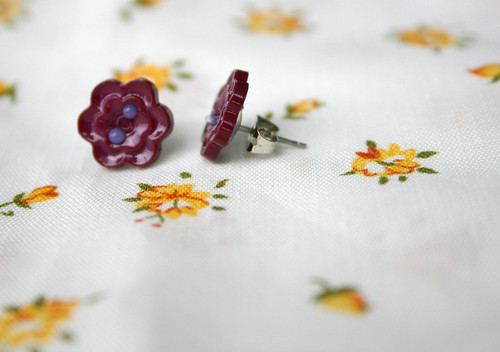
These were another set I made. See below for all sets. The earrings I made in this post are all included in the giveaway.
When you are making your own just remember, your designs are only limited by your local selection. Although, I always suggest looking online.
The earrings included in the giveaway have never worn (I've made a duplicate red pair) and have been cleansed with alcohol.
Now, I realize that this is not a sewing related post, however, I like to think that Grosgrain is as much about sewing as it is about fashion. And in my opinion these earrings SCREAM sophistication:)
Feel free to either link for the tutorial or link for the giveaway and use as many pics as you like. You know you never have to ask:)
 Ooo, ooo, ooo. I just had a flash of inspiration! Like Greg Kinnear in that car movie!
If you were to give a couple of these as gifts you could spray the metal backing green so that they would look like a rose with a stem and the findings would look like leaves!
You could use floral foam, place it in the bottom of a small gift box and stick the rose earrings up like growing flowers!
Oh, I'm so putting this on my Christmas list! All you family members out there, ignore what you just read!
UPDATE. A fellow reader just introduced me to flower cabachons. You can buy them on etsy here. Afforable and require no painting or wire cutters! And so chic! Thanks so much S.L.North
who by the way has the most charming paper poppies in her etsy shop!
As usual, if you would like a chance to win these earrings just link back to this post. If you have any questions see the "questions and answers" link to the right. If you use blogger just use the "create a link" link at the bottom of this post. If you don't use blogger, that's fine too. Just create a link on your page as you normally would and I will see it using Technorati.
Create a Link


 Like not spending money?
60 {comments}:
This "technique" has been on my list of favorites for last minute gifts and/or last minute needs for myself for a long time. At Christmas, you can take teeny, tiny "star" bows and do the same thing. Make yourself a pair in red, green, gold and silver and make all of your friends a complete set of all of the colors. Give them out at Thanksgiving time and you will have friends for life.
I'm enjoying your post very much.
Take care and
God bless,
Mimmy
What a great tutorial! I was so enthralled and ready to go looking for buttons that I forgot my piercings closed up and I haven't worn earrings in ten years! I love the pink cherry blossoms ones the best, but they are all lovely. The do have a vintage feel to them. Well done.
Hi there creative person with cool blog. Lovely giveaway! As usual.
One other way to achieve this effect with vintage flower earrings is to purchase vintage flower cabachons (conveniently totally flat on the back) and glue those to your posts. There are tons of these goodies to be had inexpensively via etsy.com/supplies.
So cute. I linked to your site so I am entering. Okay thanks for the great tutorial. I might try it sometime.
Ooo. S.L. North. Thank you for that fabulous tip! I love love love the selection. Here's the link I followed:
http://www.etsy.com/search_results.php?search_type=category&category=supplies&search_query=flower+cabachons
Hi! I linked back to your post so please enter me! I hope I win the pink flower ones or the pearly ones! =;) This is an excellent tutorial Thanks! I can't wait to try these!
Blessings!
~Rachel P.~
Wow! Now I'll think of the button racks in the fabric store completely differently! I can't wait to try it!
This is so great, and what an economical way of creating such a fashion statement! Now I love this so much I had to share it on my blog at: http://military76brat.blogspot.com/2009/06/vintage-earrings-tutorial-and-giveaway.html
Thank you for the added tutorials! I appreciate the hard work and can't wait to make Grosgrain stuff of my own! :)
I advertised this giveaway on my blog! Here is the link...
http://jessica-literarypursuits.blogspot.com/2009/06/vintage-earrings-tutorial-and-giveaway_03.html
What a great site you have! I can't wait to see what else you create and put up for giveaways!
I linked to your site but for some reason it isn't showing up. So, I figured I would leave a comment just in case.
Blessings,
Jessica P.
My mom and aunts did this when I was a little girl. :) I think I still have some of the button earrings they made for us, and a pair my older cousin made as well. What a fun idea, and a good way to use up "lost" buttons!
(I read Nie-nie too!)
küpeler çok güzel olmuş arkadaşım
sevgiler
Very cute! I just posted a link on my blog and also on the Button Floozies blog. Thanks for sharing!!
yay! thanks for the mention, I'm glad you liked my idea. :)
I made some that way for a tea party favor a few weeks back. :)
What a great tutorial and lovely giveaway. I love vintage and antique jewelry. Thanks for holding a sweet giveaway. How fun! Please sign me up.
Jody
lagitanmystique(at)q(dot)com
Those are so adorable & fun. I only wish I could be a dark-haired beauty with red lips & earrings!! Oh well, I'll settle for strawberry blonde and see if I can do my own thing! :)
I'm linking to your tutorial tomorrow from DollarStoreCrafts.com!
Oh my gosh!! These earrings look so cute. I want them so bad!!
behapppppppy(at)hotmail(dot)com
I love this idea!! Better than paying 12 bucks!! thank you.
Just letting you know that I linked to this post because I thought this idea was FABULOUS. I'm not totally crafty but I could definitely do this and they would be great gifts for anyone, well women that is. I would love to win some.
Lovely earrings! I linked to this post. :)
A giveaway AND a tutorial!! I love you!!! These are just awesome!!
I LOVE them! Very cute. :D
I love them all. I even like the pearl colored ones. Thanks for the awesome tutorial!
They are fabulous!!
Thanks for the great tutorial.
I have a jar of buttons just waiting to try it with.
I have posted a link to this blog.
Thanks for the chance to win.
Lois
This is a great idea and I am so doing this at Christmas this year! As always, I've linked! :)
What a great tutorial. Thank you. I love the vintage look.
Love, Love, Love. I just got home from Joann's and sprayed mine black. I can't wait until they're dry so I can finish them up. Thanks for the great idea. So much cheaper.
I posted a link. And I would LOVE to attempt making these for Christmas gifts. Thanks for the idea!
Next time I am feeling super crafty I am going to give this a go.
thanks.
Love 'em. I've made a bunch of earrings similar to this and have discovered that SUPER GLUE holds the beads onto the posts REALLY good. I have 3 little girls that wear the earrings swimming, sleeping, etc. and they haven't ever broken or come un-glued. Etsy is the least expensive place I've found to buy the flat backed flowers in bulk. Just thought I'd share. Happy crafting to you all!
These are such lovely earrings!!!
I posted them on my blog: http://withviolets.blogspot.com/2009/06/vintage-earrings-tutorial-and-giveaway.html . I'm going shopping asap for more of those buttons!!!
Thanks for the tutorial,
Laura
Now I’m linking from Threadbanger!! http://www.threadbanger.com/post/12889/best-dollar-store-projects-june-jewelry
What a great idea. I am all excited to go look at buttons now. I am new and very happy to find your blog. Thank you!
I make jewelry all th etime, but I enjoyed your tutorial a lot...I especially liked the hint on what gle to use since I have been using a hot glue gun and it can sometimes not hold as well...thank you and I am posting a link to here for the contest... :)
Oh my I forgot to leave my blog.. http://pbdesigns.blogspot.com
DaCraftyLady
I linked back. These are adorable.
Simply Genius! Thank you so much for sharing your inspirational creativity.
Very well done. Quite lovely.
I love it! Thanks for the tutorial. I bought a pair of button earrings at a boutique this spring. After wearing them one time I dropped them a few inches and the back broke off. The epoxy is an especially great suggestion, especially if you plan to gift/sell them.
thanks!! I love them! linked you on my blog.
Oh, I wish we had a good source for salvage buttons around here! I love this project!
Its really a nice collection of earrings. I think in this way i can create my own earrings. Thanks a lot for sharing such a nice tutorial post.
i heart this, ever so! had to post this on my blog Top 5. xx!
http://innerbeautyla.wordpress.com/2009/12/04/top-five/
Good post, I like this blog.
This tutorial will be really useful for me. I have used only store bought earwires so far and this tutorial will help me create my own earwires the way I like it
Unique Engagement Rings
love all those earrings !
I love your website photos and information is excellent
Good ,Thank you share
You can now have the photos that mean the most to you enlarged and printed onto canvas,
Here at u2canvas we will Create your own personalised photos on canvas and canvas prints and photo gifts and now with a large choice of ready made unique canvas prints only available at u2canvas online
www.u2canvas.co.uk
from 6.99
photo canvas, photos canvas, cheap photo canvas
I am very happy to discover your post as it will become number 1 in my collection of favorite blogs to visit.
Emerald earrings
This tutorial will be really useful for me. I have used only store bought earwires so far and this tutorial will help me create my own earwires the way I like it. I just should find some joann fabrics coupons now :) thanks again.
I like what in here on your post its so creative,simply but so beautiful. Keep posting!
toni
This tutorial is fantastic! Love the earrings, the giveaway is maybe closed but with your tutorial here, I'll give it a try to make one for myself. Thanks a lot :) girls jewelry boxes
I love these earrings and thank you for the tutorial. However I did have problems. I bought similar buttons from JoAnn and spray paint from Lowe's (supposed to be good for plastics). The paint never fully dried and just remained tacky. I followed directions and waited a few min between coats and used 4 coats. The second time I tried I roughed them up with sandpaper and they were still tacky. Any suggestions?
@Christina
All spray paint is different. Some kinds of glossy paint take longer to dry. I'm guessing if it was specifically for plastic it was glossy? I would spray it once then wait until ALL the tackiness is gone. You shouldn't have to use four coats if the paint is completely dry after each coat.
If all that fails then perhaps a flat spray paint would work better?
Hope that helps!
@Kathleen FrancesThanks Kathleen! Maybe I wasn't waiting long enough between coats.
good picture
I have been looking to build a good professional opinion on the topic. Your post got me a step further in the right direction. Many thanks :-)
Black Diamond Beads
You have a great artist in yourself. You have made a really awesome looking jewelry. Thank you for sharing a very valuable information to us. I will definitely to create for me as i'm not much creative I know it will not look as cool as you had created. I'll sure update this kind of stuff in my collection soon so you can even earn money for your creativity.
Post a Comment