



Showing posts with label hairmakeup. Show all posts

My Summer Beauty Routine

June 14, 2016


I've got my beauty routine for the summer down (it changes as the seasons change). For a summer look I like to go dark on the eyes and light on the lips with a bronzer on the cheeks. It takes about five minutes and gives me a healthy sunkissed summery appearance. My skin always looks best in the warm months. I have poor circulation in the cold and I guess the blood finally gets a chance to circulate around my body in the heat;-P Oddly, I'm more moisturized and my makeup just lays better (except in the EXTREME heat of course) But overall, it's a great time to look healthy instead of a sickly pale with flaking makeup.
2. First I wipe my face down with a wet facial wipe until everything is removed. I'm pretty bad at doing this at night (rarely ever do) but I've heard it's best not to sleep in your makeup. At the very least I wipe it off the next day before applying more. 

3. After my face dries I apply a very light liquid concealer under my eyes and smear it around my lids. Then I apply around my mouth and smear it around my cheeks and jawbone. The key is LIGHT. 

4. I later go back with a concealer stick and using a brush dab on a heavier concealer in the bags on my eyes (which are awful) and need the extra umpf of a stick.

Then I start on my eyes. This is most delicate part of the process and takes the longest because I need a steady hand. I like my summer eyes to be dark but ONLY on the outer edges. If I go FULL dark it just ends up looks Egyptian. 

5. I apply a crayon liner to the middle to the outer edges of my lids and I taper the line from fine (middle lid) to wide (outer lid) both on top and bottom of my eye. 

6. Then under that crayon I use a liquid liner to cover what the crayon missed (the skin closest to the lash line). 

7. Then I add a dark brown shadow from the middle of my eye to the outer edges. Finally since my eyelashes go straight down into my eyes (you can literally see them covering part of my eyes from a glance) I have to curl them up. 

8. First I use an eyelash curler then I apply the mascara. I never apply the mascara first and then curl. I know you get a better curl but in the long run it's never worth it. Eventually your lashes will break off and you're going to end up with stumpier lashes than when you started.

9. To help my lashes grow I use Revlon's Grow Luscious mascara. It helps to make your lashes stronger with continued use.
10. Then I add a light liquid bronzer to my cheeks. 

11. And finally I add a light shaded lipstick. Nude is best. If I go a little lighter on my eyes sometimes I'll go with something a little more pinkish. 

12. Voila! Done. Then I usually leave my hair down in large crimped waves. But if it's especially hot I'll bun it.

How do you change your beauty routine for the warm summer months? What looks best on your in the heat?
Revlon believes there is more than one way for women to be seen. Revlon's heritage as a color authority and its suite of innovative products inspires women around the world to express themselves through beauty each and every day.

“Disclosure: Compensation was provided by Revlon Consumer Products via Glam Media.  The opinions expressed herein are those of the author and are not indicative of the opinions or positions of Revlon Consumer Products.”

Bobby Pin Art

October 25, 2013

Make shapes with your bobby pins! Via Mucho Mucho Bueno! Try a square, try a star. Hey! Try your initials! Use a stark pin like white on black hair or black on blonde. I'd love to see more ideas!


Celtic Hair Knot (takes one minute)!

July 26, 2013

I saw this on Pinterest and decided I'd try it on Molly's hair since it's so long. Here's how it came out in the first try! It was pretty easy. You have to be good at holding multiple strands with your fingers but it was pretty straight forward. If you want to keep it in all day just secure with one or two bobby pins. Get the video tutorial below via Opening Ceremony NY.

Farfalle Pasta Hair Bows

May 23, 2013

This project can work for both girls and boys! Use them as a hair adornment or pin on as a bow tie. One for each side of a little girl’s hair looks adorable and one in the center of a baby boy’s shirt looks charming. Make one in each color for every outfit of the day.
These are actually pretty durable and they keep their shape unlike ribbons or cloth bows. They look as neat as a picture and never appear floppy or disheveled. This project is great for families who have children of a wide age range because regardless of your artistic ability, as long as the macaroni is thoroughly covered in paint, they come out looking good every time.
Simple nail polish works well on the macaroni’s surface. This was a huge selling point for me. Instead of washing paint out of cups and cleaning brushes you simply screw the nail polish lid back onto the bottles. Best cleanup ever!

These are good homemade gifts that your children can make and give to friends or family during the holidays. In my personal opinion, it almost looks like something you’d buy in the mall. In fact, I would actually wear these! And I bet no one would even realize that it used to be pasta. It can be you and your child’s little secret.

Materials Needed: 
1 box of Farfalle pasta
40mm barrette hair clips or pins
a few colors of nail polish
hot glue

Instructions:
 1.       Using the nail polish have your children color each of the macaroni pieces in any way they like. I recommend coloring the macaroni in one color first.
2.      After that coat has dried you can add more details. Some decoration suggestions are hearts, polka dots, stripes and flowers.
3.      An adult will have to help with this next step. Add a dab of hot glue to the back of your macaroni. Then press the top of your hair clip or pin clip into the glue.

4.      Let dry and wear!

Rainbow Streaked Mermaid Hair

May 22, 2013

The girls and I had some hair fun on Monday. Molly decided she wanted to have a rainbow and Lily a red streak. Since it's going to be summer soon I gave in. We used Manic Panic which should wash out in 5-6 weeks. Everything turned out good except the aqua blue. That disappeared immediately after we rinsed it out. But I think the rainbow look is still evident.
To do this I just sectioned off her hair with foil and clamped the foil with two clips at the top corners while I brushed on the colors in 4" chunks. Then I folded the foil on both sides wrapping the hair. I also used a hairdryer to heat up the foil while waiting for the dye to set. I read that this helps intensify the color.
Manic Panic is about $10 for each jar of color. If you don't want to spend $60 on the six colors of the rainbow, just get the primary colors and mix to make the secondary ones. Also, I bought mine at Sally's and they had a two for one sale, which always helps;-) To get the mermaid waves in Molly's hair I used the Hot Shot Tools ceramic deep waver also bought at Sallys.

Holiday Hair DIY

November 1, 2012

This would make a great holiday DIY for your hair. Just take some dollar store star ornaments and glue to twisty wire. Place in a line so that it starts at your temple and ends at the back of your hair. PS. Does anyone know the source of this image?


Make Your Own Nail Polish

September 19, 2012

Did anyone out there ever try this? Via Chic Factor. This would be great if you wanted to do something small like polka dots and ran out of a contrasting color. Could mix up a little on a piece of paper instead of a whole bottle if you were just detailing.

Ombre Hair for the Brunettes

September 6, 2012

I ombred my hair! I've been waiting for some time to do this but for one reason or another never got around to it. My hair is really dark so this applies to all the dark brunettes out there. It takes A LOT to lighten my hair. If your hair isn't black or dark brown use a lower developer like 10. Here's how I did it! Do you like my dress in the last photo? It's Modcloth! Only $14.99! They're having their end of season sale. Get a $20 coupon code when you spend $50 for being a cool person who reads my blog;) Must register with a an unregistered email address for coupon to work.

Kook Aid Lip Stain Recipe

September 3, 2012

I've always been into the idea of lip stains. I like my color to last but not look gloppy. Lip stains (in theory) seem like they'd be the perfect mix of long lasting and natural. But for some reason I've never been satisfied by any of the ones I've tried. Wouldn't it be funny if this was the one that finally worked for me? Via The Beauty Department.


Flower Braid

July 27, 2012

Wow. I wonder how difficult this would be to perfect. Get the tutorial via The Wedding Queen.
Source: indulgy.com via Sara on Pinterest

Ombre Nails and Red Smackers How To

July 10, 2012

This is a Sponsored post written by me on behalf of Revlon for SocialSpark. All opinions are 100% mine.
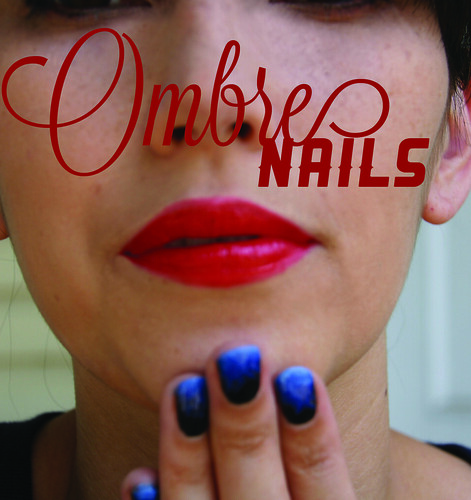
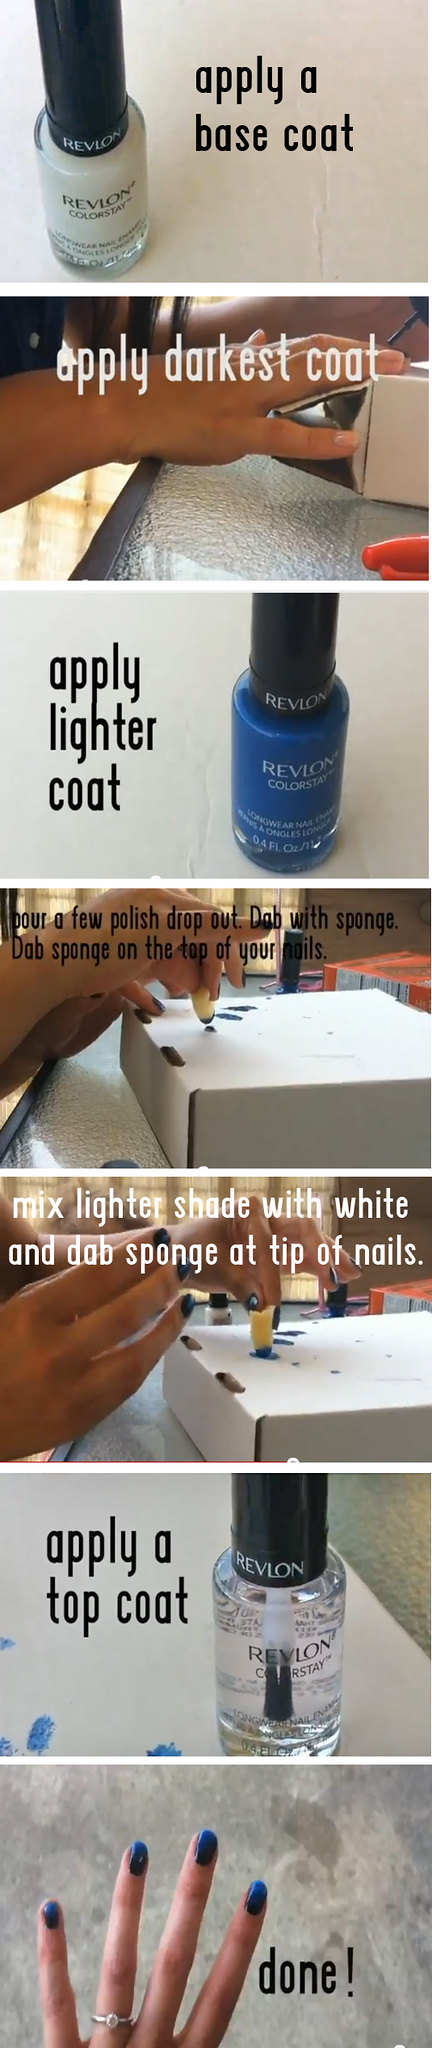
I was asked to try the Revlon Expression Experiment! So, since I've been wanting to, I decided to try an ombre nail with their nail polish. I began with a base coat of nail polish, then used a black coat, then a medium blue which I dabbed on with a piece of makeup foam. To get the lightest color at the tip of the nail I combined a white polish with the median blue color. See video tutorial below! Also, pictorial tutorial below that explains how. 

    
So I challenge you to take the Revlon Expression Experiment Challenge for yourself! Join the Revlon Expression Experiment Facebook application. Post your own expressions!

Check out my review of Revlon's bright red lipstick! So retro. (On a side note, don't you hate how YouTube won't let you choose your own cover photo? I look super goofy in that shot.) I also used a makeup primer which I found to be surprisingly helpful.

The lower inner point of my left eye always has dry skin and whenever I apply makeup it looks so much worse. I've tried everything, restoring moisturizers, petroleum jelly, even steroid cream, not much of a change. But when I used the primer, I noticed a significant difference. It's like a lotion but not greasy. Whatever it's made of, my skin apparently liked it and I plan on using it from now on.

I also took it with me camping last weekend and I still looked good even while sweating up a storm hiking up a mountain trail. Normally all my foundation would have been washed off by the time we reached the peak. But it held up to the top and even into the next morning with the help of the primer. The Revlon products I used were fantastic for all the on the go things I do which I'm sure most women can relate to. Especially the long lasting products. Check out my favorite Revlon products on Grosgrain's facebook page.

Revlon_logo_Black_largerR[1].jpg (2 documents, 2 total pages)
exp_exp_logo.jpg (2 documents, 2 total pages)
Visit Sponsor's Site

Spray Tan Back Tattoo

May 16, 2012

With summer fast approaching I've been thinking about tans lately. I've never, not once, ever had an artificial tan. Not on a tanning bed, not with a spray. But I think I'm going to pop my tanning cherry this year and try a professional spray. Something glowly but not brown. Anyone whose done it before have any good advice?


As a side note, take a look at this spray tan tattoo. Pretty neat. Would also work by painting your lighter areas black before tanning.

Amazing (But Doable) Braid

May 10, 2012

Imagine all the compliments your little one would get with this do! Wow! This looks doable yet pretty impressive! Get the full tutorial at Groovybaby....and Mama. The site is in Danish so unless you have a browser that will automatically translate use this link.


Hair Chalking

March 5, 2012

Remember that hair chalking link I posted about on Friday? Well, Kandee Johnson just posted a how-to! She has dark hair like me and my girls so I was interested to see how it turned out.
Aren't videos so easy to follow? See it below!

Hair Dye for Kids

March 2, 2012

My seven year old has been asking to dye her hair blonde to which we've been saying a definitive NO. Now, I'm not against hair dying even during mid to late teen years and I have thought about maybe letting her dye one streak of temporary color in her hair for fun, something that would wash out in one or two weeks. But it is giving me some pause.

Here's a good article about hair dying for kids.    Here's another with a tutorial.

And if your kids have blonde hair you can even use simple Kool Aid treatment.

If you're afraid of chemicals no matter how natural they claim to be, another option is to try a glued in extension. Recently Lily went to a kid themed beauty salon and they clipped a very discreet zebra blue extension in the side of her hair which she loves and is protective over every time I brush her hair before school.

So how do you feel about temporary hair dying for kids?

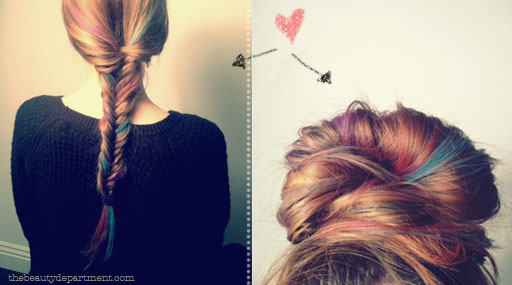
What about something like this? I might try this for myself! It wasn't dyed but instead made with soft pastel chalk! Seriously! Get the How-to at The Beauty Department.
 

Hair: Stick Bun

February 26, 2012

I totally forgot how I used to do this hairstyle when I was a teenager. But it's super easy and surprisingly sturdy.

Source: duitang.com via Beth on Pinterest


Curling Wand DIY

February 23, 2012

The Beauty Department has a nifty little tut on how to turn your curling iron into a curling wand. Do any of you prefer curling without the clamp?

Crochet Lace Bun

January 27, 2012

I love this. So simple. Just take crochet lace trim and add ties on either side. It looks beautiful because it's 'under' the bun. Sort of like it's 'supporting' it.
Source: etsy.com via Kathleen on Pinterest

Nails 2

November 2, 2011

I'm feeling the holiday spirit!
China Glaze in Tinsel Town. Oooo. I bought mine at the local Sally's.
And say HEY! Did any of you see Real Simple's no smudge tip?
Set a manicure in record time. Lightly mist cooking spray on freshly painted nails for instant smudge protection.
Haven't tried it but I wonder if it works better than a fast drying topcoat?

Hair 20

October 11, 2011

Remember that no heat curling tutorial I linked to a couple months ago? I always wanted to try it and wash my hair in the morning to wear up and let dry during the day because I don't like the feeling of having my hair bound up by night when I'm trying to sleep. But I didn't really like the band across the forehead look. But this decorative crochet lace above the bang might be a solution. I'm guessing you would just need doubled crochet trim and elastic to recreate. Here's a simple and quick tutorial on how to do that.

 
Related Posts Plugin for WordPress, Blogger...