


 Yesterday was Brian's sister- Melody's- birthday. She's currently in college. I remember as a college student I was always in need of pretty things. Pretty pillows, pretty sheets, pretty shower curtains, pretty plates, pretty glasses. SO, that's what I decided to get for her.
Seeing as it was too late to order something online, I thought the local Target might have something to that effect. To my delight they had some totally kitchy Orla Keily fruit tumblers online....online....being the keyword. Their in-store selection was quite another story all together.
Sure, they had kitch. They had kitch in every plastic form imaginable. But ask for a sea foam ceramic bowl or a flower patterned high ball glass, you'd be plum outta luck.
So disappointed, I found myself back at square one. Ugh. I had a couple hours to go until the party and didn't have a hallmark card to my name. Desperate, I went through my fabric stash and happily found my plan B.
 Still, kitchen related....I whipped up a reversible cottage chic cooking apron. I had never made an apron before but they seemed easy enough. I didn't have time to go out an buy a pattern so I simply measured and cut and came up with this.
Now, I know there are some AMAZING apron patterns out there! If time were on my side, I would have went out and purchased one because I lLOVE the way some of them look! But, I just wanted to show everyone that if you don't want to spend money on a pattern or don't have time, you can make one yourself
I think it's the perfect last minute project for any young girl, whether mother or college student....or both....especially if both!
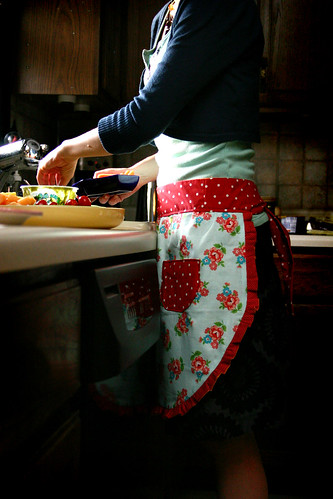
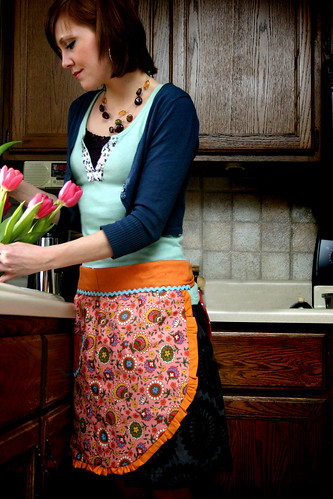
Melody, now one year older and one apron richer, was kind enough to pose avec apron.
If you ever find yourself in a gift giving pickel here's how I did it (in only 2 hours!)....
First I cut two pieces of fabric 18" x 24". One of the front blue flower pattern the other of the pink and orange pattern. I folded them in half and rounded the bottom left corner creating a wide U shape when open.
Second, I cut two 1.5" strips. One was the contrasting polka dot pattern, the other was the solid orange trim. Both were twice the length of apron from the top left side of the U shape, around the bottom and to the other top right side.
Third, I cut two 3" by 48" strips. One was the contrasting polka dot pattern, the other was the solid orange trim. You can cut the ends to a point if you'd like.
 Fourth, I sewed the 1.5" strips, right sides together, around the two short ends and one long side, leaving one long side unsewn. I turned it right side out and then ironed it flat. Then gathered it. Here's an online tutorial on how to gather if you don't know how.
Fifth, I cut out four 4" x 4" squares (one polka dot patten, one blue flowered pattern AND one orange solid color and one pink and orange pattern) and rounded the bottom corners.
Sixth, I took two and sewed the right side together on three sides. Turned right side out, folded the unsewn side inward so that no raw edges were showing then stitched across the top. I repeated this with the other two pieces. Thus making two pockets. I then sewed one pocket on three sides onto one of the 18" x 24" rectangle and did the same with the other pocket and rectangle.
Seventh, I sewed the two 18"x24" pieces together right sides together with the ruffle trim wedged between the two, leaving the top of the apron unsewn. Turn right side out.
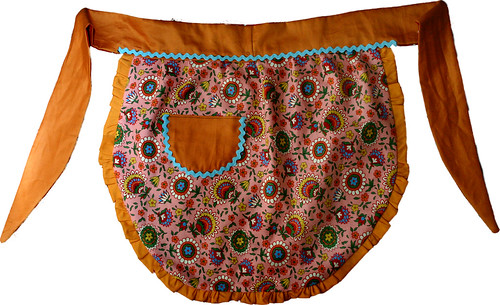 Eighth, I then slightly gathered the top of the apron.
Ninth, I sewed the two 3" by 48" strips together around the two short ends and top long side, leaving the bottom long side unsewn. I turned it right side out and then ironed it flat. I then folded the the the unsewn side inward so that no raw edges were showing, slipped the gathered apron in between and centered, then stitched across the top.


 Like not spending money?
31 {comments}:
I've actually found full-length aprons to be more useful (especially when working with flour)--if you think about it the apron was below counter in the picture, not above where it really counts. My guess is the top has disappeared in the cooking circle because no one bakes anymore. But it's still very cute and I'm glad that you posted.
What a fun project and I LOVE the fabric! If you have any ideas for my Spring Swap, I'm all ears!
Ingenious! I'm excited to try this...
Sooo cute!
too cute, I posted a link..I bake all the time. And I like different lengths for different things. I actually collect aprons..this should be on my "hook"...
Love it - I agree that it's easier to make your own pattern than many might think!
Another cutie! :-) I don't cook nor bake but I'm still lovin' those aprons :-) They're so colorful!
Oh those aprons are so pretty! Great fun!
Xxxc
http://clothestohealabrokenheart.blogspot.com/
I LOVE that people are wearing aprons again. They're so pretty--and useful!
I also love the fabrics you chose. So fun!
Thanks for posting this! What a great tutorial!
So gorgeous...but I can' even sew a straight line...maybe I should just win one of these instead??? lol!
How cute! I have an apron pattern that I am dying to use, I just have to find the perfect fabric for it.
I do tend to like the full length aprons as well, though, since I always seem to get stuff above the waistline...
Like my moms.
Great post and I love the apron. Wonderful tutorial. Hugs, Bobbi Jo
super sweet apron!!!
So adorable! My new sewing machine arrives tomorrow, so I find myself inspired by all these cute, easy little projects.
BTW, I can't believe you live in Harrisburg! We moved from there to San Francisco last June. We had the most adorable house in Paxtang right across the street from the Capital Area Greenbelt.
Wow, great job! I may just have to try this.
Cute, cute, cute!
I love the apron. But I must tell you I was sitting here chuckling to myself thinking below the waist, above the waist, in my case it's many, many years since I had a waist! Regardless I love aprons, and this is very cute, If anyone wants the can make a 12, square Of both apron fabrics, and make a bib reversabe. and insert it in the
waist band, just make your neck band the matching colours as you tie.
Kootenay Annie
Great tutorial for a cute apron!
Thanks a lot for a bunch of good tips. I look forward to reading more on the topic in the future. Keep up the good work! This blog is going to be great resource. Love reading it.
................................
good term paper-essay writing help
I know this is an older post but felt compelled to comment. I love the look of aprons like this. They're so pretty. I don't cook or bake. In fact, I hate it, yet I seem to have this apron fetish.
My mother bakes and prefers full length aprons but I hate the way they look.
I especially love vintage aprons and they're never full length. We have a bunch that belonged to my grandmother and great aunts and they're all the 1/2 aprons. It seems like that's what people who were home all the time in the 30s, 40s and 50s all baked in 1/2 aprons. :)
I'm going to try making an apron similar to this for my brother's girlfriend. She and her mom run a specialty bakery (fancy cakes and cupcakes). I thought it would give me an excuse to make a pretty apron. Thanks for the tutorial!
I have been visiting various blogs for my term papers writing research. I have found your blog to be quite useful. Keep updating your blog with in valuable information... Regards
OHHH!!! I LOVE THEM!!!! I WANT ONE SOOO BAD!!!!!!!
LINKED!!!
http://ponys4life.blogspot.com/
Happy birthday Brian.
What a fun project and I LOVE the fabric! If you have any ideas for my Spring Swap, I'm all ears!
book report writing | entrance essay writing
That being said, I have a question : do you actually get paid for writing articles like this?
book report writing | thesis writing
That being said, I have a question : do you actually get paid for writing articles like this? book report writing | admission essay writing
Agreed with you. Saying thanks will not very soon be sufficient, for the outstanding precision in your writing.
[url= http://prescriptionsavingsadvocacy.com/]prescription discount card[/url]
Agreed with you. Saying thanks will not very soon be sufficient, for the outstanding precision in your writing.
Battlefield 3
[url= http://www.gamerscomm.net/]Battlefield 3[/url]
Nice post. I like the article. Thanks for sharing.
Post a Comment