


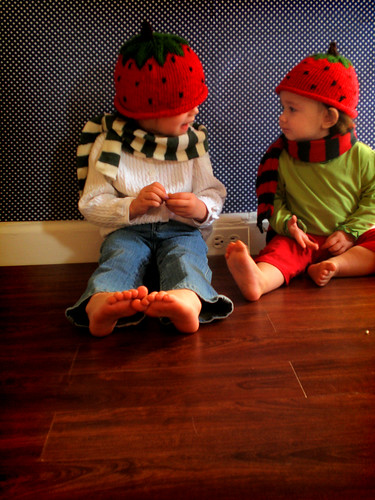
 Okay, here it is....the Strawberry Knit hat tutorial. From here on out I will try to include a sewing related tutorial every week. This one is a bit of a challenge however, because I think a knitting pattern should be accompanied by a knitting tutorial. Otherwise, for 95% of the readers, the tutorial might as well be in Japanese.
Now, just because this is a 'knitting' project DON'T think you can't do it too! The hat you saw in the Strawberry Puff Costume was the SECOND knitting project I had ever attempted- the first being a scarf. For this tutorial, I'll start off with knitting basics. All you knitting gurus can skip this part, for those of you who might need a little refresher or those of you who've never picked up a needle....read on.
First you must 'CAST ON' your yarn. Don't fret, this is the simplest of all the steps involved.
I think the best way to learn to knit is to WATCH someone do it. When I was first trying to teach myself, I tried to follow step by step instructions and the only thing I learned was the art of frustration.
So instead of having me write a long, boring, eye numbing set of instructions, I included a few videos that far surpasses my technical writing talents. First begin by 'casting on' the yarn on your needle. I recommend using a circular set of needles for a hat. It's just a hundred times easier this way. The second video should teach you how to do the basic 'Purl Stitch'. The third video will instruct you how to 'bind off'. The fourth video will show you how to 'knit two stitches together'. And the fifth video will teach you how to 'slip' two stitches together. To make the videos larger just click on the 'full screen' button on each video. It's next to the volume button.
Okay, now that you've seen how to do the basic stitches. Let me give you a quick reference as to what the abbreviations mean: CO= Cast On STS= stitches K=knit SSK= Slip, Slip, Knit K2tog= Knit two together |
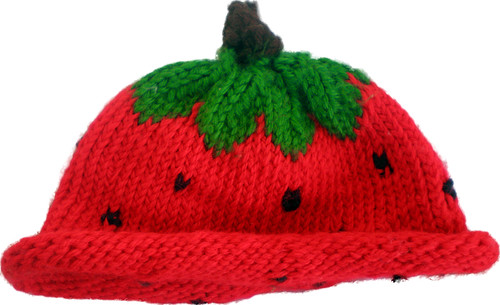
PATTERN- Ahh, finally I can get to the good stuff! Size: 6-12 months Yarn: worsted weight Needles: 4.5mm DPNs
On circular needles CO 72 sts. Place marker to indicate the beginning of the round & join, being careful not to twist knit in the round evenly for 25 rounds in red. In round 10 use one black stitch at every 10 intervals. Repeat the black stitch intervals in round 15, 20 and 25. Knit the following directions for the leaves in the corresponding colors. Use a 'Purl Stitch' as shown in the second above video for all the stitches.
| leaves: round 26: * K1, K7 * around; round 27: * K3, K5 * around; round 28: * K5, K3 * around; round 29: * K7, K1 * around; round 30: * K7, K1 * around. | decrease for crown: (in green yarn) round 31: *K6, SSK* repeat around (63) round 32: *K5, SSK * repeat around (54) round 33: *K4, SSK* repeat around (45) round 34: *K3, SSK* repeat around (36) round 35: *K2, SSK* repeat around (27) round 36: *K1, SSK* repeat around (16) round 37: *SSK* repeat around (9) round 38-43: Knit remaining 9 sts in brown round 44: K2tog around |


 Like not spending money?
23 {comments}:
Oh, thanks for the pattern and tutorial! :] It's really cute!
I love cyberseam, their videos are so easy to follow
Hmm...I think I could read Japanese better than I could the instructions. (Not that you gave bad instructions, I just don't knit...LOL)
Very (or should I say "berry") sweet hat, anyway!
thank you for posting this tutorial! I was so excited to see that it really wasn't as hard as I thought.
And I also must say because of your sewing site I have really tried to go out and sew more!
Thanks!
What cute little berries! Love those! And their baby toes--so sweet!
I am so happy you posted this. I gave up learning to knit when a book just didnt work for me. But seeing the videos has gotten me excited to try it again! I want my girlys to have strawberries too!
Thanks for the Pattern and Tutorial :o))
Soffel
okay, I do have a questions, and maybe I missed it, How do you 'add' the black yard (for seeds) when you have red on your needles?
What I normally do is just thread an extra black piece of yarn into my red yarn then tie the ends in the back, although I'm sure there's a more 'professional' way to handle that.
i really enjoy the tutorial.
i have been wanting to learn how to knit and this will definitely help me out to start.
Thank you so much.
i love it thank you!!!!!!!!!!
yeah I'm so going to try this.
Is there a tutorial on how to add in the green yard and still knit with the red?
How do the numbers change if i am to put in 144 stiches , that is double so as to have a wider circumferince ?Because i want to keep the shape . I am most worried about the leafes sin the decreasing as not to end up with an elongated shape if i just double everyting . Please help .
The instructions say to "purl" every stitch. Did you really mean to say that? When knitting in the round, using all K stitches will cause the hat to look as though we've knitted in stockinette stitch. So don't we just knit every stitch in the round?
So lovely !!! It's very wonderful... Dumpy ! I am so bad at knitting .... I can't do a jacket without holls !! A pity !
One day perhaps my girl will have this lovely hat !
awesome, I've seen a hat like that on a baby last winter and wanted to have one ever since! though I might try to crochet it as I'm very bad at knitting... but I might try to do it since it's such a lovely hat... thanks a million!!!!
Thank you very much for the video tutorials with the pattern! Made the SSK a whole lot easier!
But now I am at the end with 9 brown stitches, and it just says Knit 2 together around, but there is an uneven number??
Please how do I finish the hat?
I, too, have questions: how to add the green yarn for the leaves while working with the red yarn. Is there some other place we can go to be shown how to do that?
Thanks for the directions
Thanks...It's very wonderful!..
What type of yarn did you use and how much?
Adorable .... only ... I am 58 and I really CANNOT knit to save my life. I CAN crochet . .... so ... I wonder if I can change this to a crochet pattern .. hmm.......!!! Thanks .. it really is sweet!
I just made this and it is darling...very small for a young baby, but perfect for newborn photo shoots! I carried the green along and twisted it while doing the majority red knitting, every 3 stitches. and reversed when the red was the minority...but, round 36 should end up with 18 stitches not 16 as stated. I kept the green all the way and it's perfect! Thank you for sharing! I also did duplicate stitch for the black 'seeds' little messy on the inside, but no one sees that ;)
Post a Comment