skip to main |
skip to sidebar
 This is what you're going to have by the end of today! Are you excited? Looks like something you'd see in Modcloth. I just needed an excuse to document the lovely azalea bushes in front of our home. They only look that good for about two weeks out of the year. Yikes, I have to do some weeding! Actually, those are 90% herbs but they really don't look good in the front flower bed. Sadly, I think I'm going to have to dig them up this year:( Okay, I'm digressing. Let's go!
 1. Sew the zipper on. This will be tricky for those of you who have never sewn a zipper in. I used an invisible zipper but if you only have a regular one that’s fine too. Just be sure that it reaches several inches past your waist hem so that it can fit over your hips.
To Sew the Zipper on:
Match the zipper to the edge of the fabric as shown in photo to left. The back of the zipper is face up and the front of the zipper is against the right side (by ‘right side’ I mean top side of fabric) of the bodice.
 If you need to use pins, pin to bodice, but you must remove these as you sew. You cannot leave them in.
Fold over the top of the zipper to the back so that the top plastic part is at the top of the bodice. OR you could not fold it over and add a clasp at the top. I prefer the lazy way:)
If you have a zipper foot. Use it. If you don’t you can still sew on the zipper but it might not be quite as neat.
 Keep your presser foot to the side of the edge of the zipper as shown in the photo to the left. If you only have a normal foot the zipper will have to move under the foot. Just go very slowly. The key is to stitch as close to the zipper as possible without catching any of the teeth of the zipper. If you do catch the teeth, take out your garment, rip out the last few stitches you made and begin where you left off. If you catch the teeth even ONCE the zipper won’t work.
Here is a link to a good zipper video tutorial. I think it’s always easier to view by video. Unfortunately, I don’t have anyone to hold one for me while I sew:)

2. Stitch the zipper until you get about two or three inches from the bottom and stop.
3. Zip up the zipper
4. Find the end of your stitches.
 5. Begin sewing at the end of your stitches down to the bottom of the skirt.

6. Zipper should now look like this. If you don’t want your loose strings to get stuck in the zipper, serge or zigzag stitch the material around the zipper.
7. Iron down all the seams
8. Serge or zigzag stitch the bottom of the skirt.
9. Fold over ½” for hem and stitch.
10. For those super daring you can try the ‘blind hem’. I won’t go into that now because I think it’s a more intermediate finish but if you’d like to try here is a good instructional video. It does look a lot nicer in the end.
11. Iron your hem.
DONE! DONE! DONE!
Can you believe it? You did it! I hope it wasn’t as hard as you thought it would be.
Please post your finished work to Grosgrain Flickr! I'm so excited to see what fabrics you used, if you tried sleeves, how it looks on! I will be doing a post next week featuring all the people who posted their dress!
See:
Thursday
Wednesday
Tuesday
Monday
Preface
Pattern courtesy of The Selfish Seamstress.
 About A Frock by Friday™
SLEEVE OPTION: If you want to add a sleeve follow the instructions but do not sew the armhole bodice and facings together. I've been searching for an online graded sleeve pattern for days and this is all I could find: Here is a sleeve pattern. It is for a plus size so if you are smaller, like me, take the pattern in by 3/8” at the underarm seam for every 2 sizes and follow lines accordingly. Tape pattern together, cut out. Pin to doubled fabric and cut out of fabric. Sew hem of sleeve 1/2". Sew underarm hems together, right sides facing.

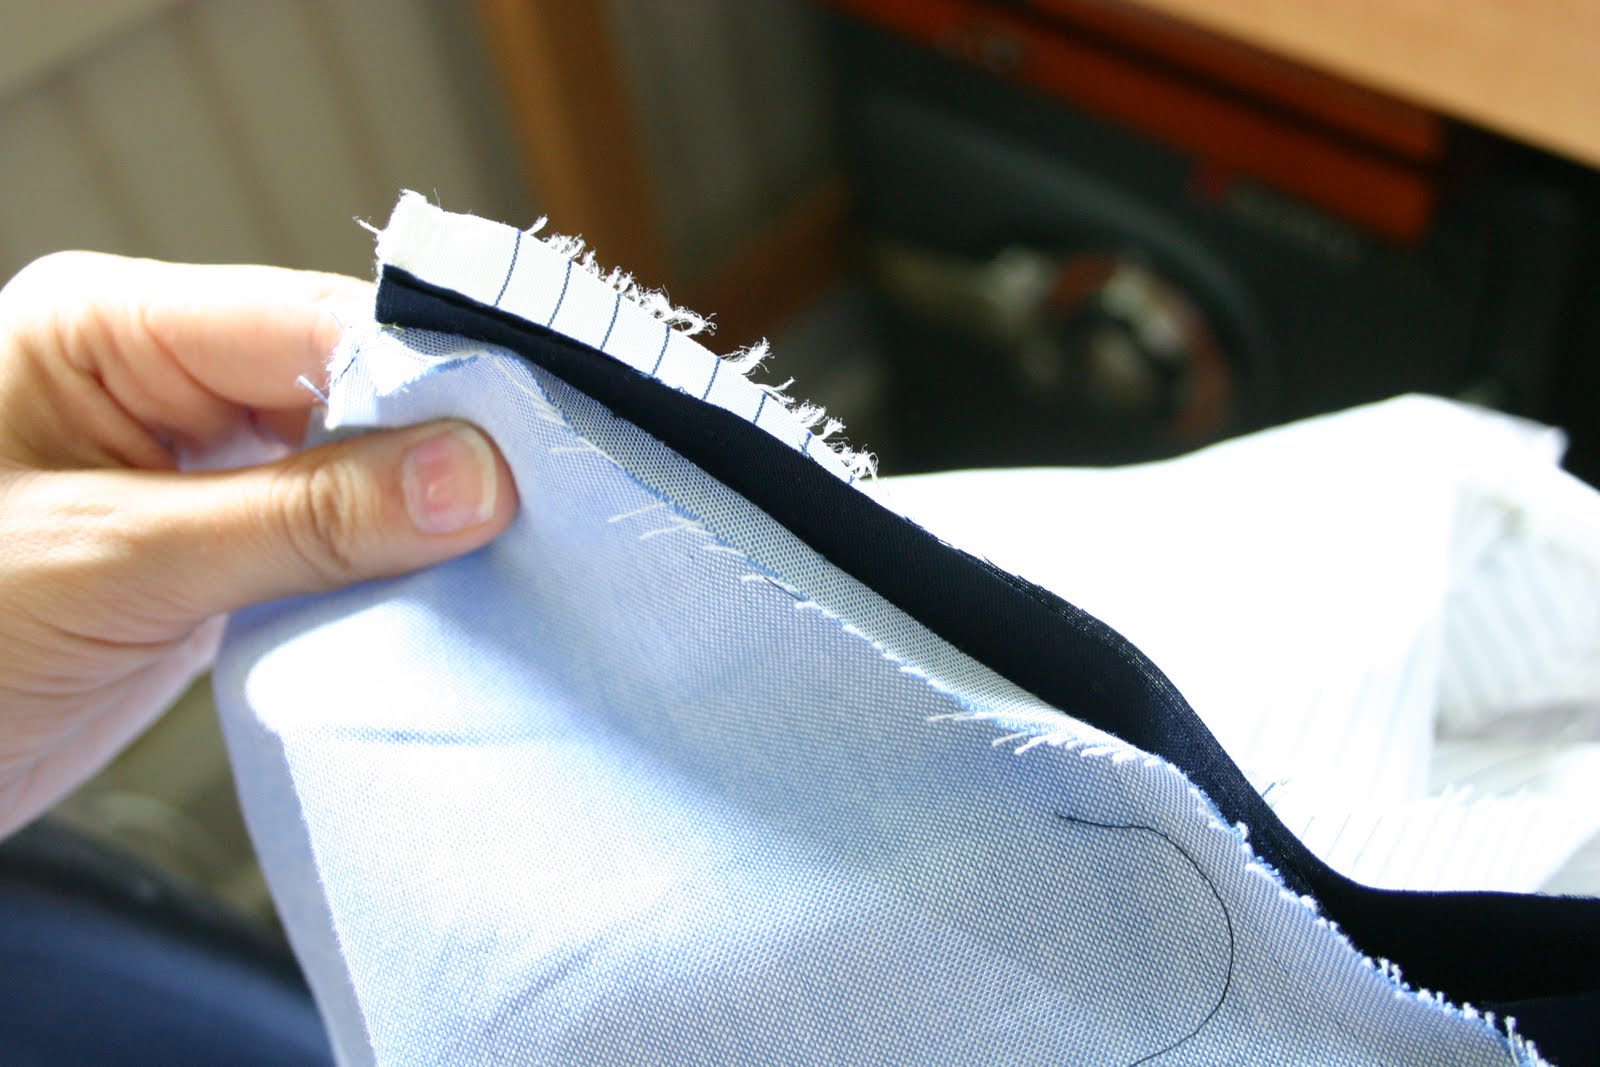
1. Line up your facing with your top right sides together. My facings were a little off. Perhaps that’s because I had to cut the seam allowance myself. But I would suggest pinning your facing to your top rather than just sewing it. If it is a little to small try to center it in your bodice like I did in the photo to the left.
 2. Sew the facing to the bodice with right sides together but leave each of the four shoulder seams open on top. See photo to left.
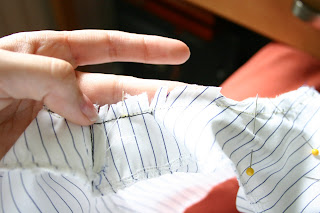
3. Clip the edges of the pattern that curve (basically everywhere you just stitched) See photo to left. This will help the fabric to lie flat when turned inside out. Remove Pins.

4. Now here comes the tricky part. Turn one of the front straps right side out. Tuck into back arm strap keeping the back arm strap wrong side out. Be sure not to twist the strap when you insert it. Just fold over and into.

5. Pin the straps together at the top with the front strap tucked into the back strap. Be sure that the pieces are all flat and not folded. Stitch across top.

6. Pull front strap out, also turning the back strap right side out as you pull.
7. Turn everything right side out.

8. Zigzag stitch or serge the opening in the back where the zipper will eventually go. Press all edges flat.
 9. (optional) The facing around my ruffle was sticking up. Using interfacing on your facing helps to keep it down but personally I had skipped that step to make things go faster. So since the ruffle hides part of the front of the bodice I stitched the facing to the front of the bodice underneath the ruffle. If the bottom of your arm hole facings are also popping out (like mine) use a thread that matches your fabric and sew a little 1” line in the armpit to keep the facing and the bodice stuck together.
10. If you want to attach a sleeve do so now. Refer to this tutorial to attach to armholes.
 11. Here’s the top so far. I just tried mine on and it is WAYYYY too small. It must be my ginormous lactating bosom that‘s throwing the measurements off. Or perhaps the pattern is off? In any case, if you try your’s on and have the same problem. Don’t worry, it’s not the end of the worldJ It’s totally fixable.
(Optional if bodice is too small) Just measure the amount of extra inches you need between the openings in the back of the dress. Take that number and divide it by 2. Cut two pieces of fabric that width and the length of the bodice PLUS THE LENTH OF THE FACING (about an extra 1 ½ for the facing) adding ¼” seam allowance to all sides. Cut two pieces of fabric.
 (Optional if bodice is too small) Sew those pieces to the two sides of the back opening of the bodice, right sides together. Zigzag or serge the edges of the new piece so that it doesn’t fray. Fold over at top. Iron flat. Done. It’s not as pretty as a seamless back but if you iron well, it can be virtually seamless.
Tip. When I wear a lifting bra, the top fits much better, so if you are going to be wearing a better bra with the dress be sure to be wearing it when you measure the amount of extra material you need to sew on.
 12. Stitch skirt front to skirt back right sides together. For the skirt back, the straightest (shorter) side is the one that you stitch to the sides of the front skirt.
*Tip. Always start at the waist of the skirt and stitch down. I, very often, find that my pieces do not match up exactly. When this happens it is easier to fix at the hem than at the waist. Just trim the extra fabric and blend it into the curve of the skirt hem.
Stop.
Tomorrow: Stitching bodice to skirt!
Pattern courtesy of The Selfish Seamstress.
 1. Cut down the dotted line of the Ruffle Line Template. I cut a U shape in the template so you could see how it should match up along your seam.

2. Align center line on the center of the bodice. Align E&F in the 1/4" seam allowance you cut in the neckline.

3. With a disappearing marker, tailor's chalk or very light pen, draw a line through the dotted lines from the Ruffle Line Template onto the right side (outside) of your fabric.
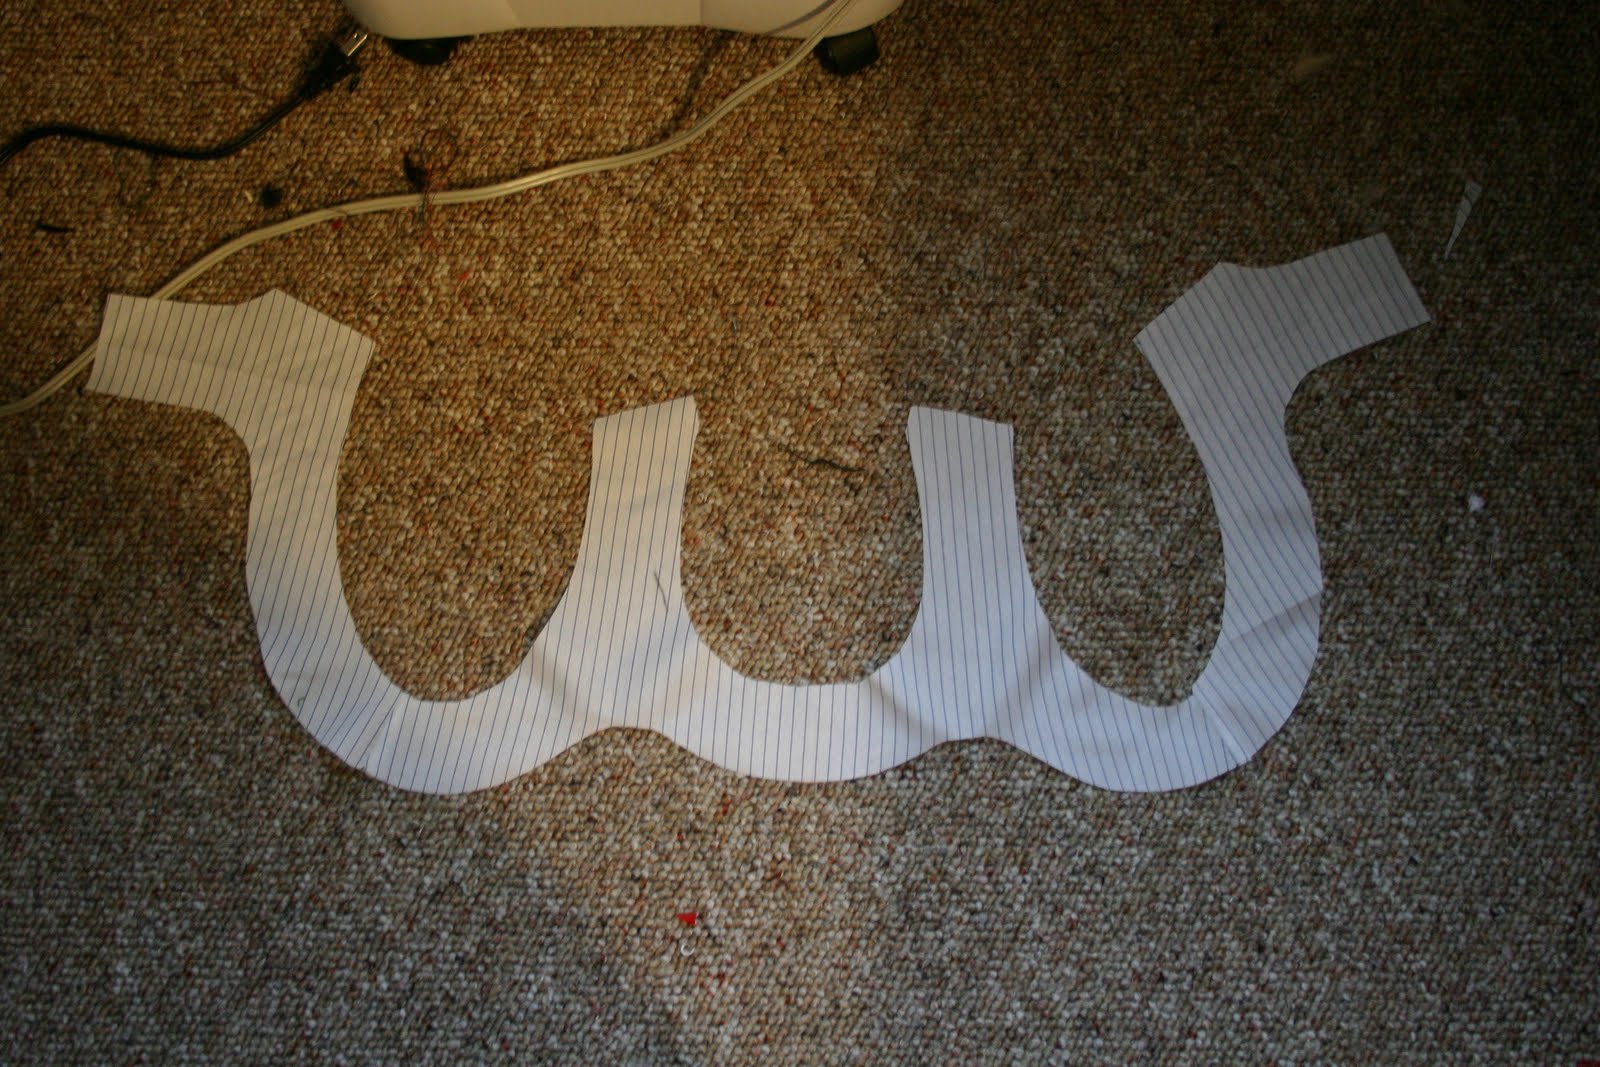
4. If you bought interfacing, apply it to the wrong side of the facings now. Then cut to shape of pattern.
 5. FINALLY. Now for the good stuff! On the wrong side of the fabric, stitch front bodice darts together. Darts are the triangle cutouts at the bottom of the bodice pieces. Use a 1/4" seam allowance. (See photo to left for reference). Do the same for the back bodice darts. Then iron seams flat.

6. Stitch back bodice to front bodice at sides, right sides together. Iron seams flat.
7. Now for the ruffle. If you have a serger, serge each long side of the ruffle rectangle piece. DO NOT STITCH ANYTHING TOGETHER. You are just encasing the fabric to keep it from fraying. If you don't have a serger just use a zigzag stitch.

8. Sew the short edges with right sides together so that your rectangle is now the same length but thinner. Turn right side out. Iron flat. (see left photo for reference).
 9. Gather. If you don't know how to gather your fabric then read on....Stitch 1/4" down from the long edge of the rectangle. When doing this set your sewing machine to the loosest, longest straight stitch. Backstitch at beginning but NOT at the end.
At the end of the stitch, take one of the strings and push down the fabric making a ruffle. Do this until the ruffle is 21" long. Tie ends of thread.
DON'T FORGET TO SET YOUR SEWING MACHINE BACK TO THE ORIGINAL SETTINGS. I always forget.

10. Pin ruffle onto front right side of bodice from A to B. Pin the ruffle so that it lies above the A-B line. (see left image for reference) Stitch to bodice from A to B. Fold down to hide stitching.
11. Okay, now here's the tricky part. When pinning the ruffle from B to C you must twist it a little so that the ruffle lies above the line. Stitch to bodice from B to C. Fold down to hide stitching. Repeat until at point E.
12. Pin remaining ruffle from point E to point F matching ruffle edge to neck edge. Stitch ruffle ½” from neck edge. Remove gathering threads from ruffle.
13. In case your ruffle was too long, cut off the extra ruffle, fold over and stitch. It won't look as neat but it will look better than having an uneven ruffle.
Here is what is should look like when you're done.
 14. Sew bodice front facing and bodice back facing right sides together at side seams.
Iron flat. If you desire, encase the lower edges of the facing in a narrow zigzag stitch.
Done for today!
Tomorrow: Sew an All-In-One Facing and Piecing the Skirt together
Pattern courtesy of The Selfish Seamstress.
2. Cut the left and bottom extra white space of all the pages. (see left image). To make this go faster, stack one row together and cut all at once. If you have a paper cutter it can go even faster.
Just post any questions in the comments section and I will try to answer them in the comments section. And remember for the next few steps BE SURE........to please overlook my ugly kitchen vinyl flooring:)
 3. Find a wide flat space to spread out. It must be a space of at least 4.5'x4'.
4. Match the letters and numbers of the papers together.
(See left image). Papers are arranged like this....
1------a,b,c,d,e,f
2------a,b,c,d,e,f
3------a,b,c,d,e,f
4------a,b,c,d,e,f
5------a,b,c,d,e,f
6------a,b,c,d,e,f
7------a,b,c,d,e,f
-------------------------------------------------------------------------------------8------a,b,c,d,e,f
I recommend working your way up from 8a-f.
3. Tape together. I used packing tape. It's nice and wide. I found it was easiest to tape the horizontal rows first then tape the rows together.
I did find one mistake in the pattern here. (See left image.) It is the Skirt Front Pattern. The pieces did not match up exactly. Maybe it was my printer, but if you have the same problem just overlap the pattern by about 1/2" and cut off the excess on the right (as shown in pic to left).
I know working with a printable PDF file seems super inconvenient but I actually PREFER them to storebought patterns. If you ever want to use the PDF pattern again just print out the piece you need. Storebought tissue patterns are always getting ripped or wrinkled or lost. Plus if you ever want to sort through your patterns, it's easier to do it on the computer rather than digging through a pile of envelopes, pulling out all the tissue sheets, finding your piece, then folding the tissue paper in just the right way to fit it back in the envelope.

4. Once you have everything taped then cut out all the pieces..
5. Fold fabric on the natural crease that was made before being cut from the bolt at the store. Place your pieces on your fabric before you cut.
*Remember if you have lines or an image on your fabric, place the pattern on the fabric as you want them to look on the dress. (IE, DON'T cut a front bodice piece with the lines on the fabric going horizontally and then cut a back bodice piece with the lines going vertically.)
* Remember the "Bodice Front Pattern", "Skirt Front" and "Bodice front facing" all need to be placed on the fold of your fabric so that after it is cut you have two patterns that connect at the middle. The rest of the pieces can be cut anywhere else on your folded fabric.
* The "Ruffle Line Template" does not get cut from fabric. It is just a guide.
* But don't forget the ruffle! It is not in any of the pattern pieces. Just cut a 6"x18" rectangle on the fold of your fabric. When opened up it should be 6"x36".
* I am making a sash for my dress. For size 36, if you would like to make one too, cut a 5.5"x17" rectangle on the fold of a complimentary colored fabric. It should be 5.5"x34" when unfolded. For each size up (ie 36, 38, 40) add1.5" or 3/4" to the folded pattern.
*Please don't be confused that I am using a different fabric for my skirt piece. I thought it might make things easier to see when we're sewing the pieces together. And I thought it would look cool:)
 6. Pin pieces to fabric.
7. Cut out pieces (THIS PATTERN HAS NO SEAM ALLOWANCE) bummer. So you must cut 1/4" away from the pattern's edge. But don't do this for the edges that lie on the fold since it isn't a seam:)
8. Take out pins and remove patterns from fabric.
Tommorrow.....Bodice!
Pattern courtesy of The Selfish Seamstress.
 Tomorrow is the day! I'm so giddy. I hope I've given all of you enough time to get your material together.
Some things to mention before I post my first few steps tomorrow.
I am going to sew this dress without all the bonus steps (ie, trimming the seam allowances, finishing inside edges). I decided to do this because when I first started sewing all those extra steps made sewing seem really tedious and difficult. I think a beginner should first learn how to do the basic steps and once they feel comfortable with those, then add the extra steps which make a dress more durable and neat.
If you feel comfortable adding these steps on your own, of course, feel free to do so.
Tomorrow we'll be cutting out the pattern. That's it. Believe it or not I think this is the most difficult part of the process. If you've already cut your fabric then great! You can skip to Tuesday. But I hope you haven't because I have a few tips that will make it easier and faster for you to finish, especially since we are using a pattern that you must print out and tape together.
I added an additional sash piece, if you're interested. And a lot of you have requested that I add a sleeve. Although I haven't cut one out yet I will try and provide the pattern for that tomorrow as well.
Any questions just ask them in the comments and I will try to answer them in the comments.
















 This is what you're going to have by the end of today! Are you excited? Looks like something you'd see in Modcloth. I just needed an excuse to document the lovely azalea bushes in front of our home. They only look that good for about two weeks out of the year. Yikes, I have to do some weeding! Actually, those are 90% herbs but they really don't look good in the front flower bed. Sadly, I think I'm going to have to dig them up this year:( Okay, I'm digressing. Let's go!
 1. Sew the zipper on. This will be tricky for those of you who have never sewn a zipper in. I used an invisible zipper but if you only have a regular one that’s fine too. Just be sure that it reaches several inches past your waist hem so that it can fit over your hips.
 If you need to use pins, pin to bodice, but you must remove these as you sew. You cannot leave them in.
 Keep your presser foot to the side of the edge of the zipper as shown in the photo to the left. If you only have a normal foot the zipper will have to move under the foot. Just go very slowly. The key is to stitch as close to the zipper as possible without catching any of the teeth of the zipper. If you do catch the teeth, take out your garment, rip out the last few stitches you made and begin where you left off. If you catch the teeth even ONCE the zipper won’t work.

 5. Begin sewing at the end of your stitches down to the bottom of the skirt.

 intermediate finish but if you’d like to try here is a good instructional video. It does look a lot nicer in the end.








 Like not spending money?
