skip to main |
skip to sidebar
 I've decided to post new winners to the front page of Grosgrain and/or on the sidebar so that more people can see whether or not they've won.
Please email grosgrainwinners@gmail.com.
The lucky winner of the Some Like It Vintage $50 Gift Card Guest Giveaway is domesticbliss of "Cromulent Crafting"
Please contact me to claim your prize!
 This is what you're going to have by the end of today! Are you excited? Looks like something you'd see in Modcloth. I just needed an excuse to document the lovely azalea bushes in front of our home. They only look that good for about two weeks out of the year. Yikes, I have to do some weeding! Actually, those are 90% herbs but they really don't look good in the front flower bed. Sadly, I think I'm going to have to dig them up this year:( Okay, I'm digressing. Let's go!
 1. Sew the zipper on. This will be tricky for those of you who have never sewn a zipper in. I used an invisible zipper but if you only have a regular one that’s fine too. Just be sure that it reaches several inches past your waist hem so that it can fit over your hips.
To Sew the Zipper on:
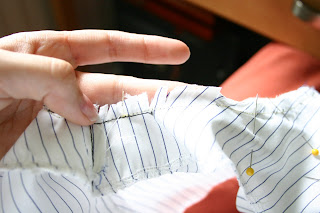
Match the zipper to the edge of the fabric as shown in photo to left. The back of the zipper is face up and the front of the zipper is against the right side (by ‘right side’ I mean top side of fabric) of the bodice.
 If you need to use pins, pin to bodice, but you must remove these as you sew. You cannot leave them in.
Fold over the top of the zipper to the back so that the top plastic part is at the top of the bodice. OR you could not fold it over and add a clasp at the top. I prefer the lazy way:)
If you have a zipper foot. Use it. If you don’t you can still sew on the zipper but it might not be quite as neat.
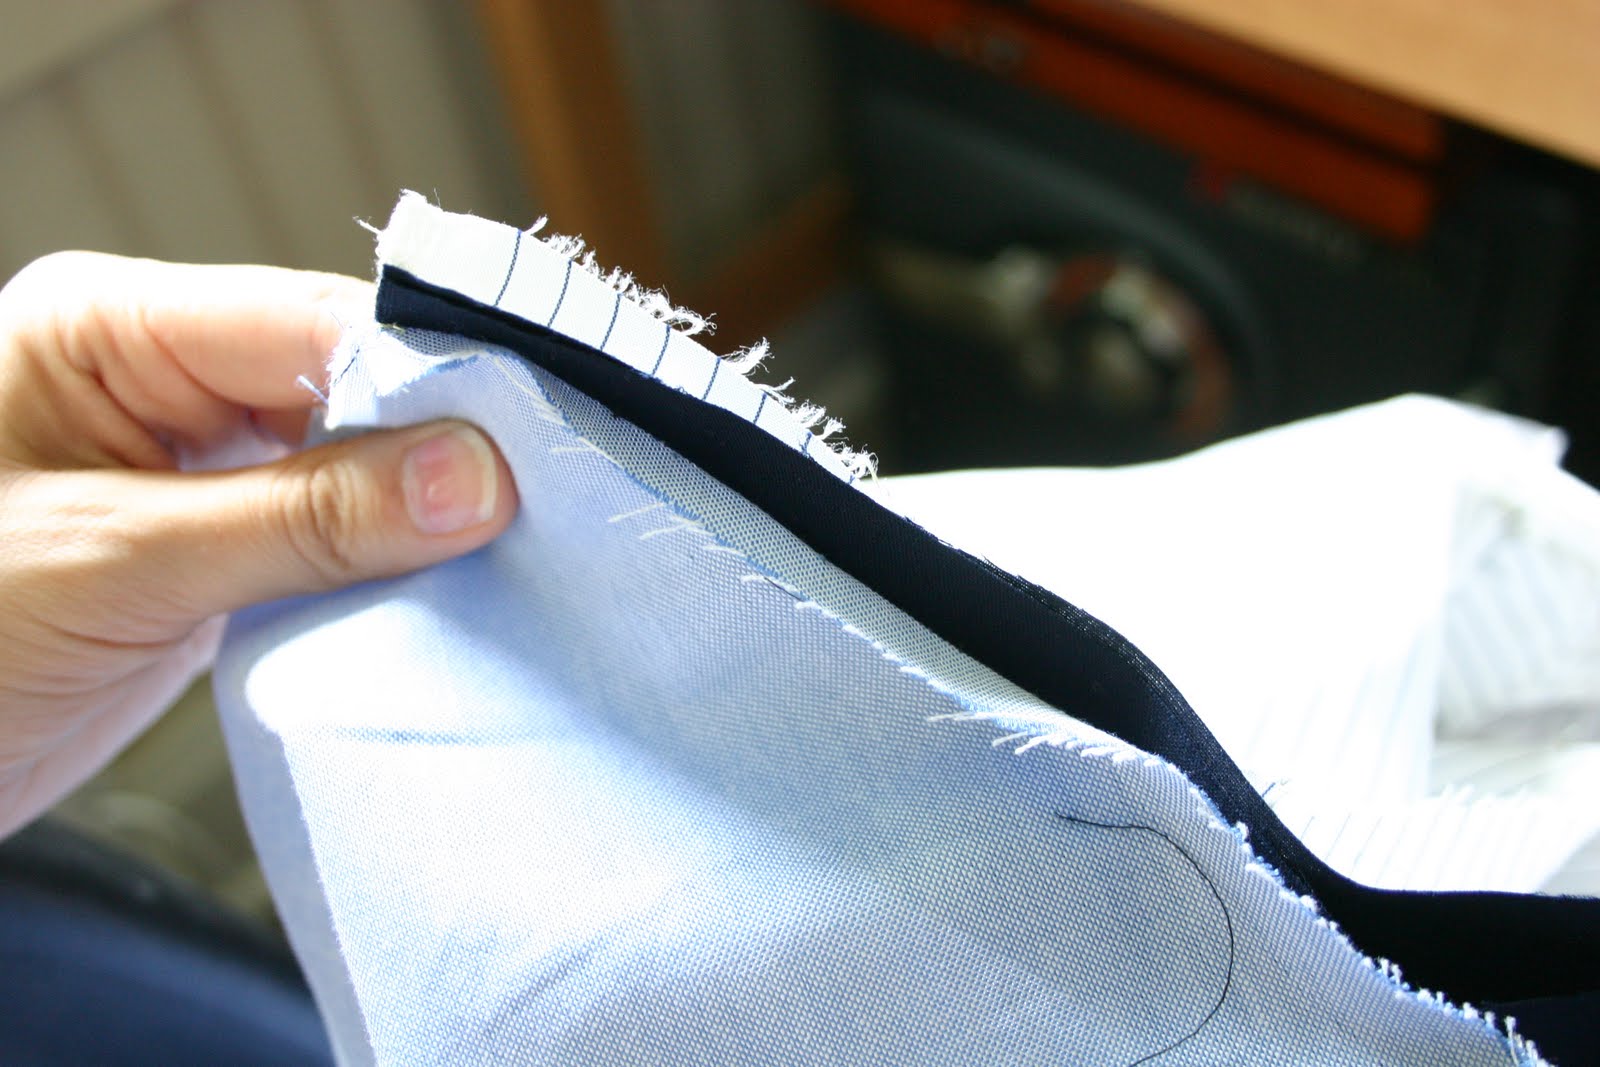
 Keep your presser foot to the side of the edge of the zipper as shown in the photo to the left. If you only have a normal foot the zipper will have to move under the foot. Just go very slowly. The key is to stitch as close to the zipper as possible without catching any of the teeth of the zipper. If you do catch the teeth, take out your garment, rip out the last few stitches you made and begin where you left off. If you catch the teeth even ONCE the zipper won’t work.
Here is a link to a good zipper video tutorial. I think it’s always easier to view by video. Unfortunately, I don’t have anyone to hold one for me while I sew:)

2. Stitch the zipper until you get about two or three inches from the bottom and stop.
3. Zip up the zipper
4. Find the end of your stitches.
 5. Begin sewing at the end of your stitches down to the bottom of the skirt.

6. Zipper should now look like this. If you don’t want your loose strings to get stuck in the zipper, serge or zigzag stitch the material around the zipper.
7. Iron down all the seams
8. Serge or zigzag stitch the bottom of the skirt.
9. Fold over ½” for hem and stitch.
10. For those super daring you can try the ‘blind hem’. I won’t go into that now because I think it’s a more intermediate finish but if you’d like to try here is a good instructional video. It does look a lot nicer in the end.
11. Iron your hem.
DONE! DONE! DONE!
Can you believe it? You did it! I hope it wasn’t as hard as you thought it would be.
Please post your finished work to Grosgrain Flickr! I'm so excited to see what fabrics you used, if you tried sleeves, how it looks on! I will be doing a post next week featuring all the people who posted their dress!
See:
Thursday
Wednesday
Tuesday
Monday
Preface
Pattern courtesy of The Selfish Seamstress.
 I need more accessories in my life. So often I focus so much on the dress that I miss out on something that really compliments- like Slightly Askew's Leather Cuffs and Obi Belts. You know I love a good belt!
Says Margot, "I love leather. Real leather. And I'm not apologizing for that. It's soft and shiney and smooth and smells great. What's not to love? So purchase a leather cuff now and wear it every day. And don't apologize for it."
Happily she is offering the Spotted Dog Snake Skin Cuff (pictured in the middle of the top photo) to one lucky Grosgrain reader. The pattern on this snakeskin reminded her of a spotted dog. This is not made out of dog skin. That would be creepy.
This cuff is silver-plated with genuine snakeskin in white with black/brown. It's soft and shiny but you can also feel the scales.
This cuff is 2" all around and has a domed shape. It's 6 1/4" around and has just over a 1" opening. It's slightly adjustable.
If you just can't wait, Grosgrain readers can receive 15% off orders through May 31st. Use the code grosgrain15 when checking out and the difference will be refunded. Many of you said that you would like to enter more giveaways, but have various issues with linking. Of course, I want anyone that is interested in entering a giveaway to be able to do so.
Therefore, from now on, giveaways can be entered in three ways:
1) By linking (to your blog, facebook, myspace, or any other site)
2) By leaving a comment without a link or
3) By linking and leaving a comment (this will be worth 2 entries which will better your chances of winning). Find more info under the FAQ page.
If you are leaving a link just use the 'create a link' at the bottom of this post or simply creating a post on your blog and including this link.If you use blogger just use the "create a link" link at the bottom of this post. If you don't use blogger, that's fine too. Just create a link on your page as you normally would and I will see it using Technorati.
Create a Link
 I've decided to post new winners to the front page of Grosgrain and/or on the sidebar so that more people can see whether or not they've won.
Please email grosgrainwinners@gmail.com.
The lucky winner of the Martha Stewart's Encyclopedia of Sewing and Fabric Crafts Guest Giveaway is Brigita of "Bluejules Sews".
Please contact me to claim your prize!
 Next week I have another 5-Day event planned in addition to my regular content. I hope you will enjoy.
I'm calling it "Total Shoe ReDo". If you have any old shoes (preferably flats) that are too wrinkled, outdated, or just plain ugly, come by Grosgrain next week to find simple ways to salvage your shoes.
I'll show you how to recover, paint and embellish some tired old flats. Instead of throwing them in the trash, make them your newest closet darlings that perfectly match your favorite outfit!
If you'd like to share, post this little button or create a link.
Create a Link
 I've decided to post new winners to the front page of Grosgrain and/or on the sidebar so that more people can see whether or not they've won.
Please email grosgrainwinners@gmail.com.
The lucky winner of the Flirty Aprons Guest Giveaway is Charlotte of "Sew Fun".
Please contact me to claim your prize!
 I've decided to post new winners to the front page of Grosgrain and/or on the sidebar so that more people can see whether or not they've won.
Please email grosgrainwinners@gmail.com.
The lucky winner of the Shabby Apple San Gabriel Guest Giveaway is Cheilita of "What's Goin' Down Episode".
Please contact me to claim your prize!
 I've decided to post new winners to the front page of Grosgrain and/or on the sidebar so that more people can see whether or not they've won.
Please email grosgrainwinners@gmail.com.
The lucky winner of the Baby Bungalow Guest Giveaway is Bryan and Natalie of "The Wonderful World of Bryan and Natalie".
Please contact me to claim your prize!
 About A Frock by Friday™
SLEEVE OPTION: If you want to add a sleeve follow the instructions but do not sew the armhole bodice and facings together. I've been searching for an online graded sleeve pattern for days and this is all I could find: Here is a sleeve pattern. It is for a plus size so if you are smaller, like me, take the pattern in by 3/8” at the underarm seam for every 2 sizes and follow lines accordingly. Tape pattern together, cut out. Pin to doubled fabric and cut out of fabric. Sew hem of sleeve 1/2". Sew underarm hems together, right sides facing.

1. Line up your facing with your top right sides together. My facings were a little off. Perhaps that’s because I had to cut the seam allowance myself. But I would suggest pinning your facing to your top rather than just sewing it. If it is a little to small try to center it in your bodice like I did in the photo to the left.
 2. Sew the facing to the bodice with right sides together but leave each of the four shoulder seams open on top. See photo to left.
3. Clip the edges of the pattern that curve (basically everywhere you just stitched) See photo to left. This will help the fabric to lie flat when turned inside out. Remove Pins.

4. Now here comes the tricky part. Turn one of the front straps right side out. Tuck into back arm strap keeping the back arm strap wrong side out. Be sure not to twist the strap when you insert it. Just fold over and into.

5. Pin the straps together at the top with the front strap tucked into the back strap. Be sure that the pieces are all flat and not folded. Stitch across top.

6. Pull front strap out, also turning the back strap right side out as you pull.
7. Turn everything right side out.

8. Zigzag stitch or serge the opening in the back where the zipper will eventually go. Press all edges flat.
 9. (optional) The facing around my ruffle was sticking up. Using interfacing on your facing helps to keep it down but personally I had skipped that step to make things go faster. So since the ruffle hides part of the front of the bodice I stitched the facing to the front of the bodice underneath the ruffle. If the bottom of your arm hole facings are also popping out (like mine) use a thread that matches your fabric and sew a little 1” line in the armpit to keep the facing and the bodice stuck together.
10. If you want to attach a sleeve do so now. Refer to this tutorial to attach to armholes.
 11. Here’s the top so far. I just tried mine on and it is WAYYYY too small. It must be my ginormous lactating bosom that‘s throwing the measurements off. Or perhaps the pattern is off? In any case, if you try your’s on and have the same problem. Don’t worry, it’s not the end of the worldJ It’s totally fixable.
(Optional if bodice is too small) Just measure the amount of extra inches you need between the openings in the back of the dress. Take that number and divide it by 2. Cut two pieces of fabric that width and the length of the bodice PLUS THE LENTH OF THE FACING (about an extra 1 ½ for the facing) adding ¼” seam allowance to all sides. Cut two pieces of fabric.
 (Optional if bodice is too small) Sew those pieces to the two sides of the back opening of the bodice, right sides together. Zigzag or serge the edges of the new piece so that it doesn’t fray. Fold over at top. Iron flat. Done. It’s not as pretty as a seamless back but if you iron well, it can be virtually seamless.
Tip. When I wear a lifting bra, the top fits much better, so if you are going to be wearing a better bra with the dress be sure to be wearing it when you measure the amount of extra material you need to sew on.
 12. Stitch skirt front to skirt back right sides together. For the skirt back, the straightest (shorter) side is the one that you stitch to the sides of the front skirt.
*Tip. Always start at the waist of the skirt and stitch down. I, very often, find that my pieces do not match up exactly. When this happens it is easier to fix at the hem than at the waist. Just trim the extra fabric and blend it into the curve of the skirt hem.
Stop.
Tomorrow: Stitching bodice to skirt!
Pattern courtesy of The Selfish Seamstress.
 I've decided to post new winners to the front page of Grosgrain and/or on the sidebar so that more people can see whether or not they've won.
Please email grosgrainwinners@gmail.com.
The lucky winner of the Allorahandmade Party Sunny Necklace Guest Giveaway is Olivia of "Adventures Elsewhere".
Please contact me to claim your prize!
 1. Cut down the dotted line of the Ruffle Line Template. I cut a U shape in the template so you could see how it should match up along your seam.

2. Align center line on the center of the bodice. Align E&F in the 1/4" seam allowance you cut in the neckline.

3. With a disappearing marker, tailor's chalk or very light pen, draw a line through the dotted lines from the Ruffle Line Template onto the right side (outside) of your fabric.
4. If you bought interfacing, apply it to the wrong side of the facings now. Then cut to shape of pattern.
 5. FINALLY. Now for the good stuff! On the wrong side of the fabric, stitch front bodice darts together. Darts are the triangle cutouts at the bottom of the bodice pieces. Use a 1/4" seam allowance. (See photo to left for reference). Do the same for the back bodice darts. Then iron seams flat.

6. Stitch back bodice to front bodice at sides, right sides together. Iron seams flat.
7. Now for the ruffle. If you have a serger, serge each long side of the ruffle rectangle piece. DO NOT STITCH ANYTHING TOGETHER. You are just encasing the fabric to keep it from fraying. If you don't have a serger just use a zigzag stitch.

8. Sew the short edges with right sides together so that your rectangle is now the same length but thinner. Turn right side out. Iron flat. (see left photo for reference).
 9. Gather. If you don't know how to gather your fabric then read on....Stitch 1/4" down from the long edge of the rectangle. When doing this set your sewing machine to the loosest, longest straight stitch. Backstitch at beginning but NOT at the end.
At the end of the stitch, take one of the strings and push down the fabric making a ruffle. Do this until the ruffle is 21" long. Tie ends of thread.
DON'T FORGET TO SET YOUR SEWING MACHINE BACK TO THE ORIGINAL SETTINGS. I always forget.

10. Pin ruffle onto front right side of bodice from A to B. Pin the ruffle so that it lies above the A-B line. (see left image for reference) Stitch to bodice from A to B. Fold down to hide stitching.
11. Okay, now here's the tricky part. When pinning the ruffle from B to C you must twist it a little so that the ruffle lies above the line. Stitch to bodice from B to C. Fold down to hide stitching. Repeat until at point E.
12. Pin remaining ruffle from point E to point F matching ruffle edge to neck edge. Stitch ruffle ½” from neck edge. Remove gathering threads from ruffle.
13. In case your ruffle was too long, cut off the extra ruffle, fold over and stitch. It won't look as neat but it will look better than having an uneven ruffle.
Here is what is should look like when you're done.
 14. Sew bodice front facing and bodice back facing right sides together at side seams.
Iron flat. If you desire, encase the lower edges of the facing in a narrow zigzag stitch.
Done for today!
Tomorrow: Sew an All-In-One Facing and Piecing the Skirt together
Pattern courtesy of The Selfish Seamstress.


 Like not spending money?